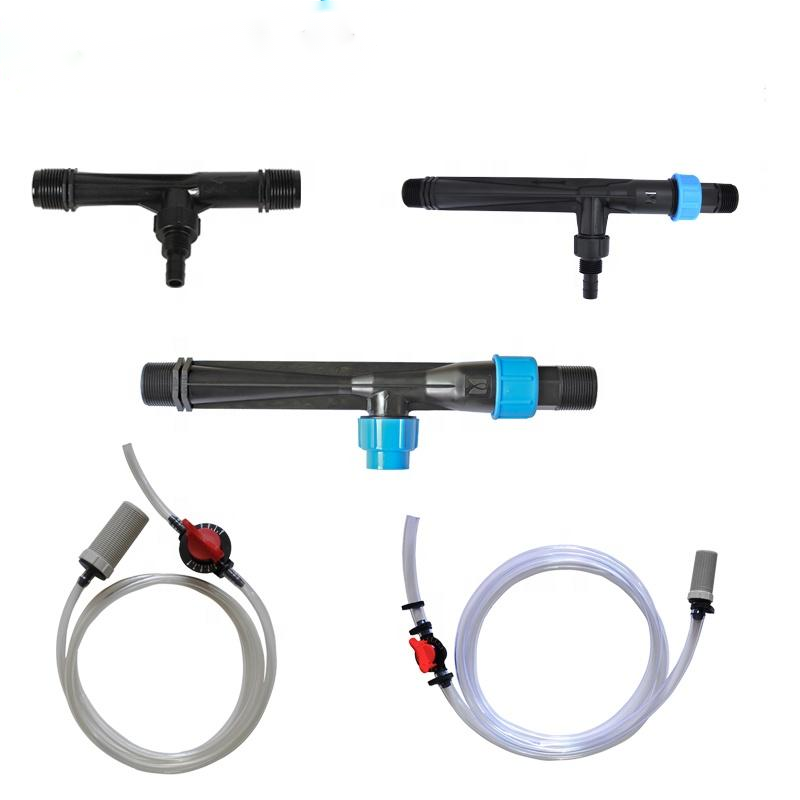
There are various Venturi fertilizer mixer injectors available in the market that can be used with a drip irrigation system. The choice of a specific Venturi injector depends on factors such as the flow rate of your irrigation system, the type of fertilizer or chemical you intend to inject, and the specific requirements of your crop or plants. Here are a few popular Venturi fertilizer mixer injectors commonly used in drip irrigation systems:
Mazzei Injectors:
Mazzei injectors are widely recognized for their high-quality performance. They offer a range of models suitable for different flow rates and applications. Mazzei injectors are known for their durability, reliability, and efficient mixing action.
Dosatron Injectors:
Dosatron injectors are another popular choice for drip irrigation systems. They are available in a variety of sizes and configurations to accommodate different flow rates. Dosatron injectors are known for their accuracy, ease of installation, and precise dosing capabilities.
MixRite Injectors:
MixRite injectors are commonly used for injecting fertilizers, chemicals, or other additives into drip irrigation systems. They offer a range of models suitable for various flow rates and applications. MixRite injectors are known for their simplicity, reliability, and ease of maintenance.
Irritec Venturi Injectors:
Irritec offers a range of Venturi injectors designed specifically for use in drip irrigation systems. Their injectors are available in different sizes and flow rates to suit various application needs. Irritec Venturi injectors are known for their efficiency and uniform mixing performance.
When selecting a Venturi fertilizer mixer injector, consider the following factors:
Flow Rate: Choose an injector that matches the flow rate of your irrigation system. This ensures proper mixing and injection of fertilizers or additives.
Injector Size: Select an injector size that can accommodate the required flow rate and pressure range of your system.
Chemical Compatibility: Check the compatibility of the injector material with the fertilizers or chemicals you plan to inject. Ensure that the injector is suitable for the specific application and chemicals you intend to use.
Maintenance and Serviceability: Consider the ease of maintenance and availability of spare parts for the injector. Look for injectors that are easy to clean, inspect, and service when necessary.
It’s recommended to consult with irrigation suppliers, manufacturers, or professionals who can provide guidance and recommend the most suitable Venturi fertilizer mixer injector for your specific drip irrigation system and requirements.
The tactile feedback and responsiveness of a custom rubber keypad are achieved through the design and construction of the keypad itself.
Here are the key factors that contribute to the tactile feedback and responsiveness:
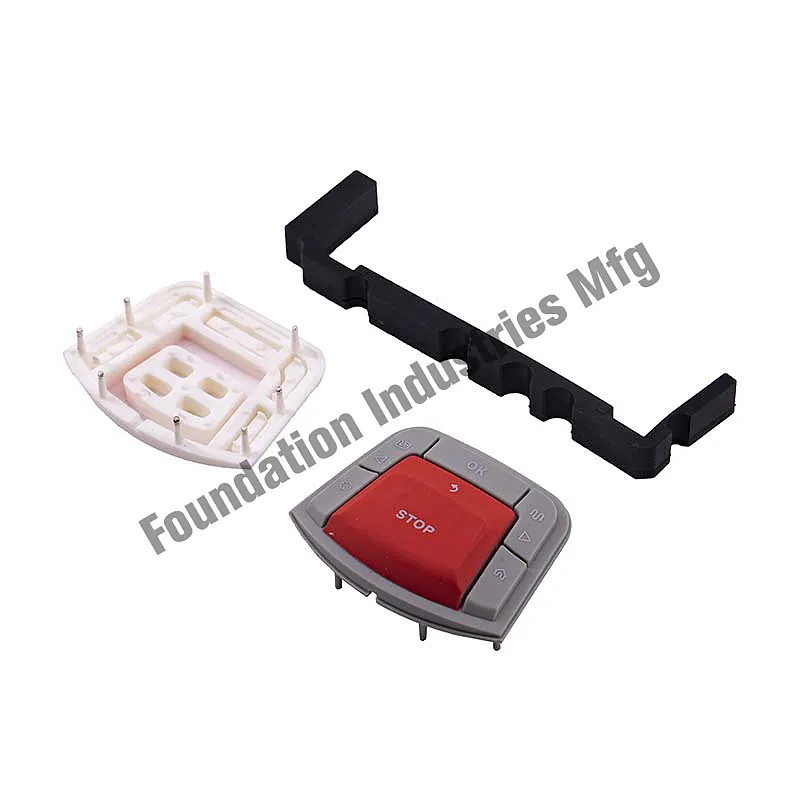
Button Design: The shape, size, and contour of the buttons on the rubber keypad play a significant role in providing tactile feedback. Raised or domed buttons are commonly used to create a distinct tactile sensation when pressed. The design may include features such as texturing or ridges to enhance the feel and grip.
Actuation Force: The actuation force required to activate a button determines the responsiveness of the keypad. It refers to the amount of force needed for the button to make contact and register an input. The actuation force can be adjusted by the design of the rubber material and the underlying mechanism.
Snap Ratio: The snap ratio is the difference in force required between the initial press and the point at which the button fully actuates. It contributes to the tactile feel by providing a noticeable “snap” or click sensation when the button is pressed.
Domes or Switches: Rubber keypads often incorporate dome-shaped structures made of metal or conductive rubber beneath each button. When pressed, these domes collapse, making contact with the underlying circuitry to register the input. custom rubber keypad The choice of dome materials and their specifications (e.g., size, shape, and force characteristics) affects the tactile feedback.
Conductive Materials: Custom rubber keypads may use conductive materials in the button construction to ensure reliable electrical contact when pressed. These materials can affect the tactile feel and responsiveness by influencing the force required for actuation.
Backlighting: Backlighting can be incorporated into the rubber keypad design to enhance visibility and provide visual feedback. Illuminated buttons can contribute to the overall user experience and complement the tactile feedback.
It’s worth noting that achieving the desired tactile feedback and responsiveness often involves a balance between factors like actuation force, snap ratio, durability, and user preferences. Custom rubber keypad manufacturers use their expertise and knowledge of materials and design principles to tailor these characteristics to meet specific requirements and user expectations.
How is a custom rubber keypad designed and manufactured to meet specific requirements?
Designing and manufacturing a custom rubber keypad involves several steps to meet specific requirements. Here is a general overview of the process:
Requirement Analysis: The first step is to gather and analyze the specific requirements for the custom rubber keypad. This includes understanding the desired functionality, performance characteristics, dimensions, button layout, and any special features or customization requirements.
Design Concept: Based on the requirements, design concepts for the rubber keypad are developed. This includes creating a visual representation of the keypad layout, button shapes, and any additional elements such as icons or graphics. Computer-aided design (CAD) software is often used in this stage.
Material Selection: The appropriate rubber material is chosen based on factors such as durability, electrical conductivity (if required), chemical resistance, and environmental conditions. The material selection is critical to meet the desired tactile properties, longevity, and performance of the keypad.
Prototype Development: A prototype of the custom rubber keypad is created to evaluate the design, functionality, and tactile feedback. This step allows for testing and refinement before moving to mass production. Prototypes can be produced using various methods, including silicone molding or 3D printing.
Tooling and Molding: Once the design is finalized, the manufacturing process begins. Tooling, which includes creating molds for the rubber keypad, is developed. The molds are typically made from steel or other suitable materials. The molds are precision machined to match the desired keypad design.
Rubber Keypad Production: The selected rubber material is injected or compression molded into the prepared molds. The rubber material is carefully cured to achieve the desired physical properties. The production process includes bonding any additional components such as conductive contact domes, backlighting elements, or connectors.
Quality Control: Stringent quality control measures are implemented throughout the manufacturing process. This includes inspecting the raw materials, monitoring the molding process, and conducting tests on samples from the production run. Various tests are performed, including dimensional checks, electrical conductivity tests, and tactile feedback evaluations.
Customization and Finishing: After the rubber keypads are molded, additional customization options are implemented based on requirements. This can include printing icons, symbols, or labeling using methods like screen printing or laser etching. Color matching, texturing, or surface coatings can also be applied to achieve the desired aesthetics and functionality.
Assembly and Integration: If necessary, the rubber keypads are assembled with other components or integrated into the target device or product. This can involve attaching connectors, cables, or interface components.
Final Inspection and Packaging: The completed rubber keypads undergo a final inspection to ensure they meet the specified requirements and quality standards. Once approved, they are packaged and prepared for shipment to the customer.
Throughout the entire process, collaboration between the customer and the rubber keypad manufacturer is crucial to ensure that the design, functionality, and performance align with the specific requirements and expectations.
The frequency of inspection and maintenance for excavator rollers can depend on several factors, including the operating conditions, intensity of equipment usage, and the manufacturer’s recommendations.
Here are some general guidelines to consider:
Daily Inspections: Perform a visual inspection of the excavator rollers before each use. Look for any signs of wear, damage, or misalignment. Check for loose or missing components such as bolts or seals.
Regular Maintenance: In addition to daily inspections, regular maintenance should be performed at specified intervals. The specific timeframe can vary, but a common recommendation is to perform maintenance every 250 to 500 operating hours or every three to six months, whichever comes first.
Lubrication: Follow the manufacturer’s guidelines for lubricating the excavator rollers. Proper lubrication helps reduce friction and wear. Lubrication requirements may differ based on the type of lubricant used and operating conditions. Generally, lubrication should be performed at regular intervals, typically after a certain number of operating hours or as specified by the manufacturer.
Environmental Considerations: If the excavator operates in harsh or extreme conditions, such as dusty environments or areas with high moisture levels, more frequent inspections and maintenance may be necessary to prevent accelerated wear and damage to the rollers.
Manufacturer’s Recommendations: Refer to the excavator’s operation and maintenance manual for specific recommendations from the manufacturer regarding inspection and maintenance intervals. Manufacturers often provide detailed guidelines based on their equipment’s design and specifications.
It’s important to note that these are general guidelines, and the specific maintenance requirements may vary based on the excavator model and manufacturer. Adhering to the manufacturer’s recommended maintenance schedule and promptly addressing any issues identified during inspections will help ensure optimal performance, longevity, and safety of the excavator rollers.
What materials are commonly used in the construction of excavator rollers?
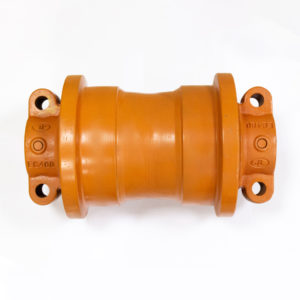
Excavator rollers, also known as track rollers or bottom rollers, are typically constructed using durable and wear-resistant materials to withstand the demanding operating conditions of construction equipment. The specific materials used can vary depending on the manufacturer and the intended application.
Here are some commonly used materials in the construction of excavator rollers:
Steel: Steel is one of the most common materials used for excavator rollers. It offers excellent strength, durability, and resistance to wear and impact. High-quality alloy steels are often employed to provide enhanced hardness and toughness.
Cast Iron: Cast iron is another material used in the construction of excavator rollers. It possesses good wear resistance and can withstand heavy loads and harsh operating conditions. China excavator roller Cast iron rollers are often used in larger excavators.
Forged Steel: Forged steel is a type of steel that has undergone a forging process to enhance its strength and durability. Excavator rollers made from forged steel exhibit excellent resistance to bending, breaking, and wear.
Polyurethane: In some cases, excavator rollers may feature a polyurethane coating or inserts. Polyurethane provides good wear resistance and helps reduce noise and vibration during operation. It is commonly used in applications where reduced noise and improved traction are desired.
It’s worth noting that the specific combination of materials and their composition can vary depending on the manufacturer, design specifications, and the specific requirements of the excavator model. Manufacturers often optimize the materials used in excavator rollers to achieve a balance between strength, durability, and cost-effectiveness.
Proper selection and quality of materials are crucial for ensuring the longevity and performance of excavator rollers under challenging operating conditions. Manufacturers typically provide guidelines and specifications for the materials used in their equipment, and it’s important to follow their recommendations for replacement or repair purposes.
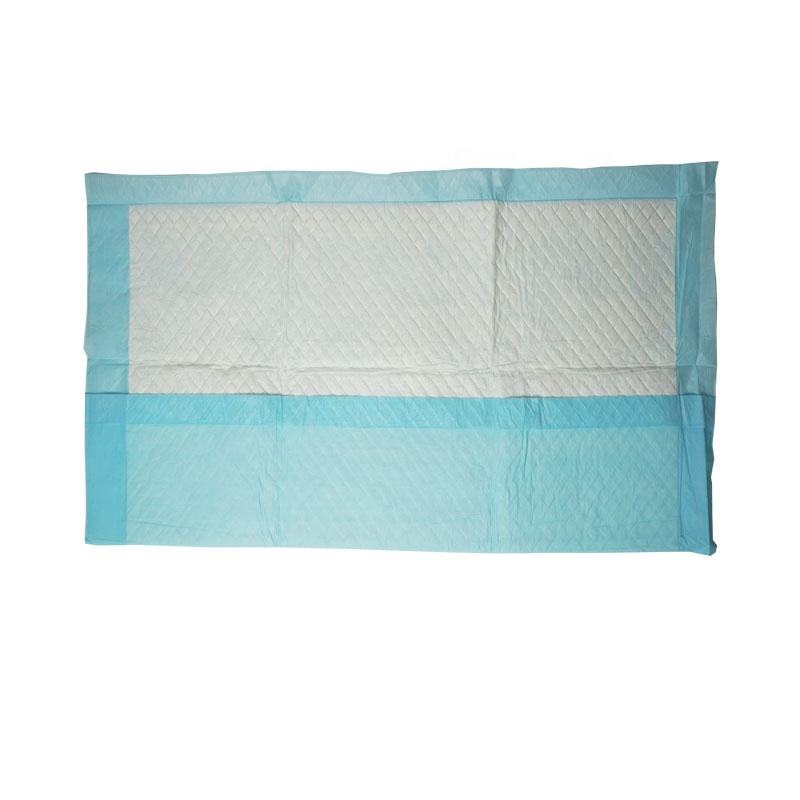
Adult baby under bed pads, also known as adult changing pads or waterproof bed pads, are essential products for individuals who wear adult diapers or have incontinence needs. They offer protection, comfort, and convenience. In China Adult Baby Under Bed Pad supplier guide, we’ll cover everything you need to know about adult baby under bed pads, including their benefits, features, usage tips, and maintenance guidelines.
Benefits of Adult Baby Under Bed Pads:
Protection: Under bed pads provide a waterproof barrier that protects mattresses and bedding from leaks, spills, or accidents, ensuring a clean and hygienic sleeping environment. Comfort: The soft and absorbent materials used in under bed pads keep the user’s skin dry and comfortable, minimizing the risk of irritation or discomfort. Convenience: These pads offer a convenient solution for managing incontinence. They are easy to use, maintain, and transport, making them suitable for home use or travel.
Features of Adult Baby Under Bed Pads:
Waterproof Barrier: Under bed pads have a waterproof or moisture-resistant backing that prevents liquids from penetrating through to the mattress or bedding. Absorbent Core: The absorbent layer quickly absorbs and locks away moisture, keeping the user dry and reducing the risk of leaks or odors. Soft and Comfortable: Under bed pads are made with soft, skin-friendly materials that provide a comfortable sleeping surface. Various Sizes and Shapes: They come in different sizes and shapes to accommodate different bed sizes and user needs. Odor Control: Many pads incorporate odor-control features to minimize unpleasant smells.
Usage Tips for Adult Baby Under Bed Pads:
Proper Placement: Place the under bed pad on top of the fitted sheet or directly on the mattress, ensuring it covers the area most susceptible to leaks. Secure the Pad: Some pads come with straps or flaps to secure them in place, preventing movement during sleep. Layering: For added protection, consider using multiple under bed pads layered on top of each other. Travel Use: Under bed pads are portable and can be used on sofas, chairs, or other furniture to provide protection while traveling or in different settings.
Maintenance Guidelines:
Washing Instructions: Follow the manufacturer’s washing instructions, which usually involve machine washing with mild detergent and tumble drying on low heat. Avoid using bleach or fabric softeners, as they can degrade the pad’s performance. Stain Removal: Promptly treat any stains with an appropriate stain remover before washing to maintain the pad’s cleanliness and appearance. Regular Replacement: Over time, under bed pads may experience wear and tear. It’s advisable to periodically inspect them and replace as needed to ensure optimal performance.
Remember, under bed pads are just one component of a comprehensive incontinence management routine. It’s essential to consult with healthcare professionals to determine the best approach for your specific needs and to explore other available products, such as adult diapers or protective underwear, if necessary.
By understanding the benefits, features, usage tips, and maintenance guidelines for adult baby under bed pads, you can make informed decisions to enhance comfort, protect bedding, and manage incontinence effectively.
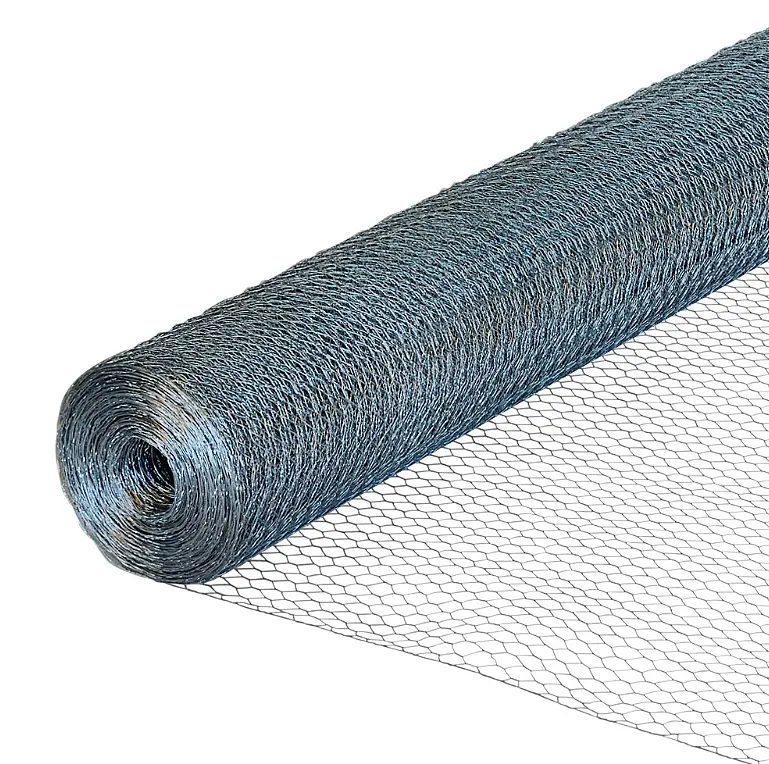
Chicken wire is available in various gauges (wire thicknesses), and the choice of gauge depends on the intended application and the level of strength or durability required.
Here are some common gauges of chicken wire and their recommended applications:
20 Gauge: This is a relatively lightweight gauge of chicken wire. It is suitable for applications where moderate containment is required, such as enclosing small poultry or creating fences for small animals like rabbits or ducks. It is also used for lightweight garden protection against small pests.
19 Gauge: Slightly thicker than 20 gauge, 19 gauge chicken wire offers increased strength and durability. It is suitable for similar applications as 20 gauge, but it provides a bit more robustness and resistance to bending or damage. It can be used for poultry enclosures, small animal cages, and garden protection.
18 Gauge: 18 gauge chicken wire is a medium-weight option that offers increased strength and durability compared to the lighter gauges. It is commonly used for poultry enclosures, garden protection against larger pests, and creating animal enclosures for small livestock like goats or sheep.
16 Gauge: This is a heavier gauge of chicken wire that provides even greater strength and durability. It is suitable for applications where a higher level of containment and durability is required, such as larger poultry enclosures, animal enclosures for medium-sized livestock, or fencing for areas prone to wildlife intrusion.
14 Gauge: 14 gauge chicken wire is a heavy-duty option suitable for demanding applications. It offers excellent strength and durability and is often used for larger animal enclosures, predator-proof fencing, or areas where there is a need for enhanced security.
It’s important to note that these gauge recommendations are general guidelines, and the specific requirements may vary depending on factors such as the size and weight of the animals being contained, the level of security needed, and the intensity of potential threats or risks in the area.
When selecting chicken wire, it’s advisable to consider the specific needs of your application and consult with a supplier or expert to ensure you choose the appropriate gauge that meets your requirements.
What gauge would you recommend for a chicken coop that needs to withstand harsh weather conditions?
For a chicken coop that needs to withstand harsh weather conditions, I would recommend using a heavier gauge of chicken wire to ensure durability and strength. A gauge of 16 or 14 would be suitable for this purpose.
Harsh weather conditions can include strong winds, heavy snow loads, or potential impacts from falling branches or debris. Using a heavier gauge chicken wire provides added resistance against these elements and helps prevent damage or breakage.
A gauge of 16 is a good balance between strength and cost-effectiveness.chicken wire wholesale It offers a substantial level of durability while still being manageable to work with. This gauge would be suitable for most chicken coops in areas with moderate to severe weather conditions.
If you anticipate particularly challenging weather conditions or if you want to prioritize maximum strength and longevity, you can opt for a gauge of 14. This heavy-duty gauge will provide extra resilience and resistance to harsh weather, ensuring the chicken coop remains secure and intact.
In addition to the gauge of the chicken wire, it’s also important to consider other factors for weatherproofing the chicken coop. This may include using a solid roof, proper insulation, and sealing any gaps or openings that could allow water or drafts to enter.
Ultimately, the specific gauge selection should be based on a combination of the severity of the weather conditions, the size and weight of the animals, and your budget. Consulting with a supplier or expert in your area can provide valuable guidance tailored to your specific needs.
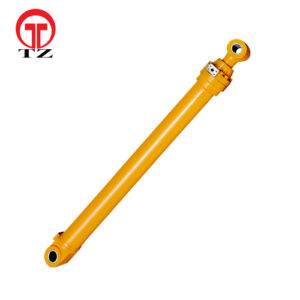
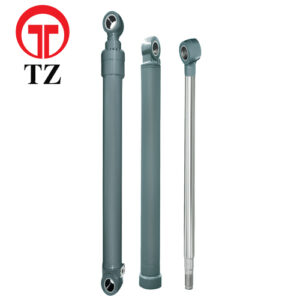
The operator controls the movement of the bucket or boom using the bucket cylinder through a control system in the excavator. The control system typically consists of hydraulic valves, levers, and joysticks that allow the operator to manipulate the flow of hydraulic fluid to the bucket cylinder.
Here’s a general overview of how the operator controls the movement:
Joystick or lever input: The operator uses joysticks or levers located in the operator’s cab to provide input signals. These input devices are connected to the hydraulic control system.
Hydraulic valves: The input signals from the joysticks or levers are transmitted to hydraulic valves. These valves regulate the flow of hydraulic fluid to the bucket cylinder.
Fluid flow control: The hydraulic valves direct the flow of hydraulic fluid to the appropriate chamber of the bucket cylinder. By controlling the flow to the rod side chamber or the head side chamber, the operator can extend or retract the cylinder, thereby controlling the movement of the bucket or boom.
Cylinder movement: When hydraulic fluid enters the rod side chamber, it pushes the piston and rod assembly outward, extending the cylinder and causing the bucket or boom to move in a specific direction. Conversely, when fluid enters the head side chamber, it retracts the rod and piston assembly, allowing the bucket or boom to move in the opposite direction.
By manipulating the joysticks or levers, the operator can control the flow of hydraulic fluid and, consequently, precisely control the movement of the bucket or boom. The operator can perform tasks such as raising or lowering the boom, tilting the bucket, or rotating the excavator’s superstructure, depending on the specific controls and features of the excavator.
What are some common tasks that operators perform using the bucket cylinder?
Operators perform various tasks using the bucket cylinder in excavators. Some common tasks include:
Digging: The bucket cylinder is used to control the movement of the excavator’s bucket for digging purposes. The operator can extend the bucket cylinder to lower the bucket into the ground and then retract it to lift and remove the excavated material.
Loading: When loading materials, such as soil, gravel, China bucket cylinder or debris, into a truck or container, the operator uses the bucket cylinder to control the bucket’s movement. They can extend the cylinder to scoop up the material and then retract it to lift and dump the load into the desired location.
Leveling: The bucket cylinder enables operators to adjust the bucket’s position for leveling surfaces. By extending or retracting the cylinder, they can raise or lower the bucket to achieve the desired ground level.
Grading: Excavators equipped with grading attachments, such as a grading bucket or a grader blade, utilize the bucket cylinder to control the grading action. The operator can extend or retract the cylinder to adjust the angle and position of the attachment, allowing for precise grading and shaping of surfaces.
Trenching: Trenching involves digging long, narrow excavations for various purposes like installing utility lines or drainage systems. Operators use the bucket cylinder to control the depth and width of the trench. By extending or retracting the cylinder, they can adjust the bucket’s position to create the desired trench dimensions.
Lifting and Placement: The bucket cylinder is also utilized to lift heavy objects with the excavator’s bucket or attached lifting equipment. Operators can control the cylinder to raise or lower the load and position it accurately at the desired location.
These are just a few examples of the tasks that operators perform using the bucket cylinder. The versatility and control provided by the cylinder enable operators to efficiently carry out a wide range of excavation and material handling operations.
Performing regular maintenance tasks on the boom cylinder of an excavator helps ensure its optimal performance and extend its lifespan.
Here are some common maintenance tasks for the boom cylinder:
Visual Inspection: Regularly inspect the boom cylinder for any signs of damage, leaks, or wear. Look for hydraulic fluid leaks around the seals, cracks or dents on the cylinder barrel, and any loose or damaged mounting hardware.
Seal Inspection and Replacement: Check the hydraulic seals on the boom cylinder for signs of leakage or wear. Leaking seals can lead to decreased performance and potential damage to other hydraulic components. Replace any worn or damaged seals promptly.
Lubrication: Follow the manufacturer’s recommendations for lubrication of the boom cylinder. Apply the appropriate lubricant to the cylinder’s moving parts, such as the piston rod, to ensure smooth operation and reduce friction.
Cleaning: Regularly clean the boom cylinder to remove dirt, debris, and other contaminants. Use a soft cloth or brush and mild detergent if necessary. Keeping the cylinder clean helps prevent the accumulation of abrasive particles that can damage seals or cause internal wear.
Hydraulic Fluid Inspection: Check the hydraulic fluid level and quality regularly. Ensure that the fluid level is within the recommended range and that it is clean and free from contamination. If necessary, drain and replace the hydraulic fluid as per the manufacturer’s guidelines.
Pressure Testing: Periodically test the hydraulic pressure of the boom cylinder using appropriate pressure gauges. This ensures that the cylinder is operating within the specified pressure range and helps identify any potential issues with the hydraulic system.
Mounting Hardware Inspection: Inspect the mounting pins, brackets, and other hardware that secure the boom cylinder. Ensure they are properly tightened and free from damage or signs of wear. Replace any worn or damaged hardware to maintain a secure connection.
Regular Maintenance Schedule: Create a regular maintenance schedule for the boom cylinder based on the manufacturer’s recommendations. Follow the schedule to ensure timely inspections, lubrication, and other maintenance tasks.
It’s important to consult the specific maintenance guidelines provided by the excavator manufacturer for detailed instructions and recommendations regarding the boom cylinder. Adhering to these maintenance tasks can help optimize the performance, reliability, and safety of the boom cylinder and the overall excavator operations.
What are some signs that indicate the boom cylinder seals need to be replaced?
There are several signs that indicate the boom cylinder seals may need to be replaced. Here are some common indicators to look out for:
Hydraulic Fluid Leaks: One of the most obvious signs of seal failure is the presence of hydraulic fluid leaks around the boom cylinder. If you notice fluid accumulating or dripping from the cylinder, it indicates that the seals are not effectively containing the hydraulic pressure. Leaks may appear as visible drips or as wet spots around the cylinder.
Reduced Performance: If you notice a decrease in the boom cylinder’s performance, such as slow or jerky movement, difficulty extending or retracting the cylinder, or lack of smooth operation, China excavator boom cylinder it could be a sign of worn or damaged seals. Seals that no longer provide a tight seal can result in decreased hydraulic pressure and compromised cylinder movement.
Increased Hydraulic Fluid Consumption: If you find that the excavator’s hydraulic fluid levels consistently decrease and require frequent refills, it may be due to seal failure. Leaking seals can cause hydraulic fluid to escape the system, leading to a noticeable increase in fluid consumption.
External Seal Damage: Visually inspect the boom cylinder seals for any visible signs of damage, such as cracks, tears, or excessive wear. Damaged seals are more prone to leakage and can compromise the overall performance of the boom cylinder.
Abnormal Noises: Unusual noises, such as hissing or whistling sounds, during the operation of the boom cylinder may indicate seal problems. These noises can occur when hydraulic fluid is escaping through worn seals, causing air to enter the system.
Cylinder Drift: If the boom cylinder exhibits uncontrolled movement or drifts when it should remain stationary, it could be a sign of seal failure. Worn or damaged seals may not effectively hold the hydraulic pressure, resulting in unintended cylinder movement.
If you observe any of these signs, it is recommended to have a qualified technician inspect the boom cylinder and seals. They can assess the condition of the seals and determine whether replacement is necessary. Timely seal replacement helps maintain the proper functioning of the boom cylinder, prevents further damage, and ensures the safety and efficiency of the excavator.
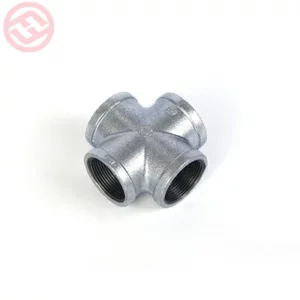
American Standard Malleable Iron Fittings are versatile and widely used in various plumbing applications.
Here are some common applications where these fittings are frequently employed:
Water Supply Systems: Malleable iron fittings are commonly used in residential, commercial, and industrial water supply systems. They are used to connect pipes, redirect flow, and create branches in the plumbing network.
Gas Distribution Systems: Malleable iron fittings are suitable for use in gas distribution systems, including natural gas and propane systems. They provide a secure and reliable connection between pipes and gas appliances.
Plumbing Installations: These fittings are utilized in a wide range of plumbing installations, such as bathroom and kitchen fixtures, showers, toilets, sinks, and washing machines. They enable proper connection and distribution of water within the plumbing system.
HVAC (Heating, Ventilation, and Air Conditioning) Systems: Malleable iron fittings are employed in HVAC systems for connecting pipes, diverting airflow, and creating junctions. They are commonly used in applications such as air conditioning units, heating systems, and ventilation ductwork.
Fire Protection Systems: Malleable iron fittings are often utilized in fire protection systems, including sprinkler systems and fire hydrant installations. These fittings provide a reliable connection to ensure effective fire suppression in buildings and industrial facilities.
Industrial Piping: Malleable iron fittings are suitable for various industrial applications, such as chemical plants, refineries, factories, and power plants. They are used to connect pipes and facilitate the transport of fluids, including water, oil, and chemicals.
Agricultural Irrigation: Malleable iron fittings find application in agricultural irrigation systems. They are used to connect pipes and valves, allowing for efficient water distribution to crops and fields.
It’s important to note that the specific applications may vary depending on the size, type, and configuration of the malleable iron fittings, as well as the requirements of the plumbing or piping system in question.
What are the advantages of using malleable iron fittings compared to other types of fittings?
There are several advantages to using malleable iron fittings compared to other types of fittings:
Strength and Durability: Malleable iron fittings are known for their high tensile strength and durability. They can withstand heavy loads, high pressures, and mechanical stresses without deforming or breaking, making them suitable for demanding plumbing applications.
Corrosion Resistance: Malleable iron fittings have excellent corrosion resistance, especially when compared to standard cast iron fittings. They can withstand exposure to moisture, chemicals, and various environmental conditions, American Standard Malleable Iron Fittings reducing the risk of rust and corrosion over time.
Versatility: Malleable iron fittings are available in a wide range of shapes, sizes, and configurations. This versatility allows for easy adaptation to different plumbing system requirements, making them suitable for diverse applications and installations.
Temperature Resistance: Malleable iron fittings exhibit good heat resistance, enabling them to handle hot water and high-temperature fluids without deformation or failure. They are commonly used in both hot and cold water supply systems.
Threaded Connections: Malleable iron fittings typically feature threaded connections, which allow for easy installation and disassembly. The threaded design ensures a secure and tight connection, minimizing the risk of leaks or loosening over time.
Impact and Vibration Resistance: Malleable iron fittings have excellent resistance to impact and vibration, making them suitable for applications where pipes may be subject to mechanical stresses or movement. They provide a reliable and stable connection even in dynamic environments.
Compatibility: Malleable iron fittings are compatible with various pipe materials, including copper, steel, and plastic. This compatibility allows for easy integration into existing plumbing systems or the flexibility to choose the most suitable pipe material for a specific application.
Cost-Effective: Malleable iron fittings offer a cost-effective solution for plumbing installations. They are generally more affordable than some alternative materials like stainless steel or brass fittings while providing comparable durability and performance.
It’s worth noting that malleable iron fittings may require periodic maintenance, such as inspections, cleaning, and application of protective coatings, to ensure long-term performance and prevent any potential issues associated with corrosion or degradation.